Monday, April 28, 2025

Unleashing the Power of Docker and Docker Compose: Building Lightweight and Secure Containers


Introduction

In today's cloud-native world, containerization is the cornerstone of modern software development. Docker has revolutionized how developers build, ship, and run applications. Along with Docker Compose, it simplifies the orchestration of multi-container applications. In this guide, we'll dive deep into Docker fundamentals, explore how to create super lightweight Docker images, and implement key security measures to safeguard containerized applications.


What is Docker?

Docker is an open-source platform that automates the deployment of applications inside lightweight, portable containers. A Docker container packages code, runtime, libraries, and dependencies, enabling applications to run reliably across different computing environments.

Key Benefits:

  • Portability

  • Scalability

  • Efficiency

  • Isolation

  • Faster CI/CD pipelines

Core Components of Docker:

  • Docker Engine: The runtime responsible for building and running containers.

  • Dockerfile: A blueprint defining how the image is built.

  • Docker Images: Read-only templates for creating containers.

  • Docker Containers: Running instances of images.

  • Docker Hub: A repository to store and share Docker images.


What is Docker Compose?

Docker Compose is a tool used to define and manage multi-container Docker applications. With a single YAML file (docker-compose.yml), you can configure all your application's services, networks, and volumes.

Advantages of Docker Compose:

  • Simplifies multi-container deployment.

  • Consistent development, testing, and production environments.

  • Easy scaling and service management.


Example:

version: '3'

services:

  web:

    build: ./web

    ports:

      - "5000:5000"

  redis:

    image: "redis:alpine"

How to Create Lightweight Docker Images

Building small, optimized Docker images reduces:

  • Attack surface area

  • Startup time

  • Storage and bandwidth usage

Best Practices:

  1. Choose Minimal Base Images:

    • Use Alpine Linux (alpine) instead of Ubuntu or Debian.

    • Example:
      FROM node:alpine

  2. Use Multi-stage Builds:

    • Separate build environment from runtime environment.

    • Example:

      # Build Stage

      FROM golang:1.18 AS builder

      WORKDIR /app

      COPY . .

      RUN go build -o myapp


      # Final Stage

      FROM alpine

      WORKDIR /app

      COPY --from=builder /app/myapp .

      ENTRYPOINT ["./myapp"]

  3. Minimize Layers and Files:

    Use .dockerignore to exclude unnecessary files.

    Combine RUN commands to reduce layers.

  4. Avoid Installing Debug Tools:

    • Remove curl, wget, editors unless absolutely necessary.

  5. Use Distroless Images:

    • Google's distroless images contain only the application and its runtime, no package manager or shell.


Key Docker Security Best Practices

Running containers securely is crucial for any production environment. Here are essential security measures:

  1. Use Official and Trusted Images

    • Always pull images from verified sources like Docker Hub Official Images.

  2. Scan Images for Vulnerabilities

    • Tools like docker scan, Snyk, or Trivy help find security flaws.

  3. Run Containers as Non-Root Users

    • Modify Dockerfile:

      RUN adduser -D myuser
      USER myuser
  4. Enable Docker Content Trust (DCT)

    • Ensures image integrity and publisher verification.

    • Set:

      export DOCKER_CONTENT_TRUST=1
  5. Limit Container Capabilities

    • Use the --cap-drop flag to remove unnecessary Linux capabilities.

  6. Use Read-Only Filesystems

    • Prevent containers from writing to the filesystem:

      docker run --read-only myimage
  7. Use Secrets Management

    • Avoid hardcoding credentials. Use Docker secrets or environment variables.

  8. Regularly Update and Patch Images

    • Rebuild images periodically to apply security patches.

  9. Network Isolation

    • Use custom Docker networks to limit communication between containers.


Conclusion

Docker and Docker Compose empower developers to build, deploy, and manage applications with unprecedented speed and flexibility. However, simply containerizing an app isn't enough. Creating lightweight images and adhering to robust security practices ensures that your containers are efficient, secure, and production-ready.

By mastering these principles, you can take full advantage of Docker's power while minimizing risks and optimizing performance in any environment.


Bonus Tip: Docker Commands Cheat Sheet

  • Build Image: docker build -t myapp .

  • Run Container: docker run -d -p 80:80 myapp

  • Compose Up: docker-compose up -d

  • Compose Down: docker-compose down

  • List Images: docker images

  • Scan Image: docker scan myapp


Ready to containerize smarter? Start small, stay secure, and ship faster with Docker!

#docker #dockercompose #containers #security #devops #cloudnative

Wednesday, April 23, 2025

Kubernetes: The Ultimate Guide to Container Orchestration (2025)


Kubernetes: The Ultimate Guide to Container Orchestration (2025)

Meta Title: Kubernetes Explained: Complete Beginner to Advanced Guide | BitCode Matrix
Meta Description: Master Kubernetes in this comprehensive 2025 guide by BitCode Matrix. Learn container orchestration, architecture, benefits, and how Kubernetes scales modern apps.


Introduction to Kubernetes

If you're stepping into the world of cloud-native technologies, Kubernetes is a name you can’t afford to miss. As enterprises shift from monolithic to microservices-based architectures, Kubernetes stands at the heart of DevOps, helping teams orchestrate, scale, and manage containerized applications seamlessly.

In this guide, BitCode Matrix walks you through Kubernetes — from basics to expert-level concepts.


๐Ÿ” What is Kubernetes?

Kubernetes (aka K8s) is an open-source container orchestration platform that automates the deployment, scaling, and operation of application containers.

Originally developed by Google and now maintained by the Cloud Native Computing Foundation (CNCF), Kubernetes is the industry standard for managing applications in Docker containers and beyond.

๐Ÿ”‘ Key Features:

  • Automatic bin packing

  • Self-healing capabilities

  • Load balancing and service discovery

  • Horizontal scaling

  • Zero-downtime deployments


๐Ÿš€ Why Learn Kubernetes in 2025?

With the rise of DevOps, Microservices, and CI/CD Pipelines, Kubernetes is becoming essential for developers and IT teams. Here's why:

  1. Cloud-Native Ecosystem: Kubernetes is cloud-agnostic and supports hybrid and multi-cloud setups.

  2. Scalability: Auto-scales workloads based on demand.

  3. Developer Velocity: Simplifies deployment workflows.

  4. High Availability: Ensures uptime with built-in redundancy.


๐Ÿงฑ Kubernetes Architecture Explained

๐Ÿ”ธ Control Plane

  • API Server

  • etcd (Key-value store)

  • Controller Manager

  • Scheduler

๐Ÿ”ธ Worker Node Components

  • kubelet

  • kube-proxy

  • Container Runtime (Docker, containerd)


⚙️ Core Components in Kubernetes

Manage the overall state of the cluster:

kube-apiserver
The core component server that exposes the Kubernetes HTTP API
etcd
Consistent and highly-available key value store for all API server data
kube-scheduler
Looks for Pods not yet bound to a node, and assigns each Pod to a suitable node.
kube-controller-manager
Runs controllers to implement Kubernetes API behavior.
cloud-controller-manager (optional)
Integrates with underlying cloud provider(s).

ComponentPurpose
PodsSmallest deployable unit
ServicesExpose pods with stable IPs
DeploymentsManage replica sets
ConfigMaps & SecretsManage configs & sensitive data
NamespacesIsolate workloads logically

Node Components

Run on every node, maintaining running pods and providing the Kubernetes runtime environment:

kubelet
Ensures that Pods are running, including their containers.
kube-proxy (optional)
Maintains network rules on nodes to implement Services.
Container runtime
Software responsible for running containers. Read Container Runtimes to learn more.

๐Ÿ“ˆ How Kubernetes Helps Scale Applications

Kubernetes scales your application automatically using metrics like CPU usage or custom-defined metrics.
Set up Horizontal Pod Autoscaling (HPA) and Cluster Autoscaler to manage demand spikes during traffic surges.


apiVersion: autoscaling/v2 kind: HorizontalPodAutoscaler ...


๐Ÿ” Kubernetes Security Best Practices (2025)

  1. Enable RBAC (Role-Based Access Control)

  2. Use PodSecurityPolicies or OPA/Gatekeeper

  3. Scan images for vulnerabilities

  4. Encrypt secrets at rest using KMS

  5. Implement network policies to restrict traffic


๐ŸŒ Kubernetes Networking Essentials

  • ClusterIP: Internal communication

  • NodePort: External access

  • LoadBalancer: Cloud-native external load balancing

  • Ingress: URL-based routing


๐Ÿ› ️ Set Up a Kubernetes Cluster (Hands-On)

✔ Using Minikube for Local Setup

minikube start kubectl get nodes


๐Ÿ“Š Kubernetes Monitoring & Observability

Integrate tools like:

  • Prometheus + Grafana

  • ELK Stack

  • Jaeger for tracing

Tracking metrics and logs ensures uptime, performance, and compliance.


๐Ÿ”„ CI/CD with Kubernetes

Automate your builds using:

  • GitHub Actions

  • Jenkins X

  • ArgoCD for GitOps

These tools reduce manual errors and promote faster delivery cycles.


๐Ÿ“ฃ Kubernetes vs Docker Swarm vs Nomad

FeatureKubernetesDocker SwarmNomad
Popularity๐Ÿ”ฅ๐Ÿ”ฅ๐Ÿ”ฅModerateNiche
Auto-scaling
EcosystemHugeSmallGrowing

๐Ÿ“Œ Conclusion: Kubernetes is Here to Stay

Kubernetes is not just a trend — it’s the backbone of cloud-native architecture. Whether you're a developer, DevOps engineer, or an enterprise architect, learning Kubernetes in 2025 is a career-boosting move.

๐Ÿ”ฅ Apache HTTP Server: The OG of Web Servers


Apache HTTP Server: A Comprehensive Guide to Setting Up and Optimizing Your Web Server


Introduction to Apache HTTP Server

Apache HTTP Server, commonly known as Apache, is one of the most popular and widely used open-source web servers. First released in 1995, Apache has become the foundation of the internet, powering millions of websites worldwide. Whether you're a developer, a system administrator, or a DevOps engineer, mastering Apache is essential for managing web traffic, hosting websites, and ensuring optimal performance.

In this guide, we’ll cover everything you need to know about Apache HTTP Server, from installation to optimization and key features. Let’s dive in!


What is Apache HTTP Server?

Apache HTTP Server is a versatile web server that serves web pages to users by handling HTTP requests. Apache is highly configurable and can host dynamic content, such as PHP or Python scripts, as well as static content, like HTML, CSS, and JavaScript files. Apache’s modular architecture and wide community support make it a go-to solution for various web hosting needs.

Key Features of Apache HTTP Server:

  • Open-source and free: Apache is an open-source project, meaning it’s free to use and modify.

  • Cross-platform compatibility: Apache works across various platforms, including Linux, Windows, and macOS.

  • Modular architecture: Apache can be extended with modules, allowing you to customize it based on your needs (e.g., SSL encryption, URL rewriting).

  • Highly configurable: Apache allows for detailed configuration through .conf files and supports virtual hosting to host multiple websites on a single server.


Why Choose Apache HTTP Server?

While newer web servers like NGINX are gaining popularity, Apache HTTP Server remains one of the most reliable and trusted web server solutions. Here’s why you should consider using Apache:

  1. Mature and Stable: Apache has been around for over two decades and is a proven solution for web hosting.

  2. Extensive Documentation and Support: With a large community and extensive documentation, troubleshooting and learning are made easy.

  3. Flexible Configuration: Apache allows for detailed configuration, including support for .htaccess files, making it ideal for users who need fine-grained control.


Apache HTTP Server vs NGINX: A Comparison

Both Apache HTTP Server and NGINX are widely used web servers, but they have different strengths and weaknesses. Here's a quick comparison:

FeatureApache HTTP ServerNGINX
PerformanceGood for dynamic content, slower for staticHigh performance, great for static content
ArchitectureProcess-based (multi-threaded)Event-driven (asynchronous)
Configuration.htaccess files for flexible controlSimple and fast configuration
Best UseLegacy applications, shared hosting, dynamic contentReverse proxy, load balancing, static sites

Apache remains the preferred choice for hosting PHP applications (like WordPress) and when detailed configuration control is required.


How to Install Apache HTTP Server

Installing Apache on Ubuntu/Debian

To get started with Apache HTTP Server, follow these easy installation steps.

  1. Update your package list:

    sudo apt update

  2. Install Apache:

    sudo apt install apache2

  3. Start Apache service:

    sudo systemctl start apache2

  4. Enable Apache to start on boot:

    sudo systemctl enable apache2

  5. Check Apache’s status:

    sudo systemctl status apache2

Once installed, open your web browser and type http://localhost. You should see the Apache default page, confirming that Apache is working properly.


Optimizing Apache HTTP Server for Performance

While Apache is highly reliable out of the box, there are several tweaks you can make to improve its performance.

1. Enable GZIP Compression

GZIP compression reduces the size of web pages, improving load times. Enable it with the following configuration:

sudo a2enmod deflate

Add this to your Apache configuration:

SetOutputFilter DEFLATE

2. Use Caching

Leverage Apache’s mod_cache module to cache content for faster load times:

sudo a2enmod cache

You can set cache expiration rules to ensure that static resources are cached effectively.

3. Optimize KeepAlive Settings

KeepAlive helps keep connections open, reducing latency for multiple requests. Enable and tweak it as follows:


KeepAlive On MaxKeepAliveRequests 100 KeepAliveTimeout 5

4. Disable Unnecessary Modules

Apache comes with a wide range of modules, some of which you may not need. Disable unused modules to reduce memory usage and improve performance:

sudo a2dismod module_name

Apache HTTP Server Security Best Practices

Security is always a priority when hosting web servers. Here are some best practices for securing Apache HTTP Server:

1. Enable SSL Encryption with mod_ssl

Ensure your website is served over HTTPS by enabling SSL. Install an SSL certificate (e.g., from Let’s Encrypt) and configure Apache to use it.

2. Keep Apache Updated

Regularly update Apache to protect against security vulnerabilities. Use your package manager to update:

sudo apt update && sudo apt upgrade apache2

3. Limit Access with .htaccess

You can use .htaccess files to control access to sensitive areas of your website. For example, limit access to admin pages:


<Files "admin.php"> Order Deny,Allow Deny from all Allow from 192.168.1.1 </Files>

Apache HTTP Server Resources

To expand your knowledge of Apache HTTP Server, here are some useful resources:


Conclusion

Apache HTTP Server is a robust, feature-rich web server that has stood the test of time. Whether you’re hosting dynamic websites or managing complex web applications, Apache provides all the tools you need. With the ability to optimize for performance, enhance security, and scale your infrastructure, Apache remains a top choice for web hosting.

By understanding its key features, installation process, and optimization techniques, you can ensure that your Apache server runs smoothly and efficiently.

๐ŸŒ The 30-Day Low-Waste Challenge: Simple Swaps to Start Your Sustainable Journey


Introduction:

  • Quick intro to the concept of low-waste living

  • Why small changes matter

  • Invitation to join the 30-day challenge

Section 1: What is Low-Waste Living?

  • Explanation of “low-waste” vs “zero-waste”

  • Common myths debunked

  • Focus on progress, not perfection

Section 2: How the Challenge Works

  • One simple action per day

  • Categories: Kitchen, Bathroom, On-the-Go, Habits, Shopping

  • No pressure to be perfect — flexibility is encouraged

Section 3: Week-by-Week Breakdown

Week 1: Kitchen Consciousness

  1. Swap plastic wrap for beeswax or silicone wraps

  2. Start composting food scraps

  3. Use reusable produce bags

  4. Ditch paper towels for cloths

  5. DIY all-purpose cleaner

  6. Plan a zero-waste grocery trip

  7. Store leftovers in glass containers

Week 2: Sustainable Self-Care

  1. Try a shampoo bar

  2. Use a bamboo toothbrush

  3. Switch to refillable hand soap

  4. Ditch facial wipes for reusable cloth pads

  5. Refill toiletries instead of rebuying

  6. Explore DIY skincare (scrubs, masks)

  7. Track water usage

Week 3: Habits and Home

  1. Unplug electronics when not in use

  2. Wash clothes in cold water

  3. Hang dry clothes

  4. Say no to junk mail

  5. Repair instead of replace

  6. Donate unused items

  7. Shop second-hand

Week 4: Out & About

  1. Carry a reusable water bottle

  2. Bring your own shopping bags

  3. Refuse plastic straws and utensils

  4. Try public transport or carpool

  5. Pack a zero-waste lunch

  6. Visit a local farmer’s market

  7. Do a trash audit of your day

Final Days: Reflect and Share

  1. Choose one long-term change

  2. Share your journey on social media

Section 4: Tools and Resources

  • Links to apps, websites, local directories

  • Printables: Challenge calendar, checklists, habit trackers

Conclusion:

  • Recap benefits of small, sustainable changes

  • Encourage readers to keep going beyond 30 days

  • Invite comments or shares of their progress


๐ŸŒ The 30-Day Low-Waste Challenge: Simple Swaps to Start Your Sustainable Journey


If you've ever thought about living more sustainably but didn't know where to begin — this challenge is for you. Welcome to the 30-Day Low-Waste Challenge, where each day introduces one small, practical swap to help reduce waste and tread a little lighter on the planet.

No need to go full zero-waste overnight. This is about progress, not perfection — and yes, you can totally do this with a busy schedule and a tight budget.


๐Ÿ’ก What Is Low-Waste Living?

Low-waste living is all about minimizing the trash we send to landfills. Unlike the pressure of “zero-waste,” the low-waste mindset is more flexible, more realistic, and more inclusive. It means being mindful of consumption, reducing single-use items, and creating habits that align with environmental values.

The goal? Less waste. More intention. No guilt trips.


๐Ÿ›  How the Challenge Works

Every day for 30 days, you'll take one simple action toward reducing your waste. We’ve broken the challenge into four themes:

  • Kitchen Consciousness

  • Sustainable Self-Care

  • Habits and Home

  • Out & About

Feel free to adapt it to your lifestyle. Miss a day? Just pick up where you left off — the planet’s not keeping score.


๐Ÿ“… Your 30-Day Low-Waste Plan

๐Ÿฅฆ Week 1: Kitchen Consciousness

  1. Swap plastic wrap with beeswax or silicone alternatives

  2. Start collecting food scraps for composting

  3. Bring reusable produce bags to the grocery store

  4. Replace paper towels with washable cloths

  5. Make your own all-purpose cleaner (vinegar + citrus peels = magic)

  6. Try shopping at a bulk store or bring your own containers

  7. Use glass or stainless steel to store leftovers

๐Ÿ› Week 2: Sustainable Self-Care

  1. Try a shampoo bar — less plastic, lasts longer

  2. Use a bamboo toothbrush

  3. Refill your soap bottle at a zero-waste shop

  4. Swap disposable facial wipes for reusable pads

  5. Refill body wash/shampoo at a local refill station

  6. Try making a simple scrub with sugar + coconut oil

  7. Track your shower time — aim to use less water

๐Ÿก Week 3: Habits and Home

  1. Unplug devices when not in use

  2. Wash laundry in cold water to save energy

  3. Air dry your clothes — your electric bill will thank you

  4. Opt out of junk mail (try DMAchoice.org)

  5. Mend that shirt you’ve been meaning to fix

  6. Donate unused stuff instead of tossing it

  7. Visit a thrift store for your next clothing haul

๐ŸšŒ Week 4: Out & About

  1. Carry a reusable water bottle everywhere

  2. Never forget your shopping bags again (keep one in your car/bag)

  3. Say “no straw, please” at restaurants

  4. Take public transport or try biking

  5. Pack your lunch in a reusable container

  6. Support your local farmer’s market

  7. Do a mini trash audit — what's in your bin today?

๐ŸŒฑ Final Days: Reflect and Share

  1. Choose one change to keep doing long-term

  2. Share your journey — inspire someone else to start!


๐Ÿงก Final Thoughts

Sustainable living isn’t about being perfect. It’s about showing up, doing what you can, and making choices that align with your values. The beauty of this challenge is how small changes add up over time — and often spark even bigger ones.

So whether you complete all 30 days or just a handful, you're already making a difference.

Let us know in the comments: Which swap are you trying first?


Monday, April 21, 2025

๐Ÿš€ Blue-Green Deployment with Traffic Routing Using Virtual Services (Istio)


๐Ÿ“ Meta Description:

Learn how to implement blue-green deployments using Istio's virtual services for safe, zero-downtime application upgrades. Includes architecture, step-by-step examples, and best practices.

๐Ÿ”‘ Keywords:

Blue-Green deployment
Istio virtual service
kubernetes deployment strategies
Canary vs blue green
Traffic routing in istio
Zero downtime deployment

๐Ÿง  What is Blue-Green Deployment?

Imagine deploying a new version of your application…
๐Ÿ”น Without downtime
๐Ÿ”น Without breaking production
๐Ÿ”น With instant rollback capability

Welcome to Blue-Green Deployment, a release strategy that minimizes risk and gives you full control over your production rollouts. And when combined with Istio Virtual Services, it becomes a powerful tool for modern DevOps teams.

In this blog, we'll walk you through the what, why, and how of Blue-Green deployments with dynamic traffic routing in Kubernetes.

๐ŸŒ Why Use Istio for Blue-Green Deployment?

Istio, a powerful service mesh for Kubernetes, allows fine-grained traffic control using VirtualService and DestinationRule. This makes it ideal for blue-green deployments, letting you:

  • Route traffic based on percentage, headers, cookies, etc.

  • Gradually shift traffic to the green version

  • Instantly rollback in case of failure


๐Ÿ—️ Setup Overview

We'll use the following stack:

  • Kubernetes (minikube or EKS/GKE)

  • Istio for service mesh & traffic control

  • kubectl + istioctl for deployment & management


๐Ÿงฑ Architecture Overview


๐Ÿ“ Deployment Files

⚙️ Step-by-Step Implementation

1️⃣ Blue Deployment (blue-deployment.yaml)

apiVersion: apps/v1 kind: Deployment metadata: name: app-blue spec: replicas: 2 selector: matchLabels: version: blue template: metadata: labels: version: blue spec: containers: - name: app image: yourrepo/yourapp:blue ports: - containerPort: 80


2️⃣ Green Deployment (green-deployment.yaml)

apiVersion: apps/v1 kind: Deployment metadata: name: app-green spec: replicas: 2 selector: matchLabels: version: green template: metadata: labels: version: green spec: containers: - name: app image: yourrepo/yourapp:green ports: - containerPort: 80

๐ŸŒ Virtual Service + Destination Rule

๐Ÿงญ Destination Rule (destination-rule.yaml)

apiVersion: networking.istio.io/v1beta1 kind: DestinationRule metadata: name: app-destination spec: host: app-service subsets: - name: blue labels: version: blue - name: green labels: version: green

๐ŸŽฏ Virtual Service (virtual-service.yaml)

Initially routing 100% traffic to Blue:

apiVersion: networking.istio.io/v1beta1 kind: VirtualService metadata: name: app-virtualservice spec: hosts: - app-service http: - route: - destination: host: app-service subset: blue weight: 100 - destination: host: app-service subset: green weight: 0

๐Ÿ’ก To shift traffic, just adjust the weights:

  • Gradual shift: Blue 50 / Green 50

  • Final shift: Blue 0 / Green 100


๐Ÿ” Traffic Shifting Example

50/50 Split:

- destination: host: app-service subset: blue weight: 50 - destination: host: app-service subset: green weight: 50

100% to Green (Go Live):

- destination: host: app-service subset: green weight: 100

๐Ÿงช Testing the Setup

After deploying everything:

kubectl apply -f blue-deployment.yaml kubectl apply -f green-deployment.yaml kubectl apply -f destination-rule.yaml kubectl apply -f virtual-service.yaml

Then test your app endpoint:

curl http://<your-ingress-ip>

Use Istio's built-in dashboard (Kiali) or Grafana for traffic metrics.


๐Ÿ’ก Pro Tips


TipDescription
๐Ÿ›‘ Use probesReadiness and liveness to avoid routing to unhealthy pods
๐Ÿ”’ Secure routingUse mTLS between versions
๐Ÿ” AutomateUse ArgoCD or GitHub Actions to update routing rules
๐Ÿ“Š MonitorUse Prometheus to detect performance regressions
๐Ÿ”™ Rollback instantlyChange weights back to blue to rollback

๐Ÿ”„ Blue-Green vs Canary Deployment

FeatureBlue-GreenCanary
Traffic ControlBinary switchGradual rollout
RiskLow, but switch is suddenLower, with granular control
RollbackSimpleMore complex
Ideal ForFull version swapsA/B testing, feature rollouts

๐Ÿ‘‰ Use Canary for micro-changes and Blue-Green for major version jumps.

๐Ÿง  Final Thoughts

Blue-Green deployments offer a robust and easy-to-implement strategy to

achieve zero downtime, seamless rollouts, and instant rollback.

Combined with Istio Virtual Services, it becomes a modern, scalable

solution for Kubernetes-based applications.

So go ahead and make your next deployment smoother and safer —

without your customers even noticing!

How to Build a Real-Time Data Pipeline with Apache Kafka and Apache Spark

๐Ÿ“ Meta Description:

Learn how to create a real-time data pipeline using Apache Kafka and Apache Spark for streaming, processing, and analyzing data efficiently. A step-by-step guide with code examples.

๐Ÿ”‘ Keywords:

Real-time data pipeline
Apache kafka tutorial
Spark streaming kafka integration
Kafka producer consumer
Big data streaming
Real-time ETL

๐Ÿš€ Introduction

In a world where milliseconds matter, batch processing just doesn't cut it anymore. Companies today rely on real-time analytics to power everything from fraud detection to customer personalization.

So how do you go real-time? Enter Apache Kafka and Apache Spark — a powerful combo that can help you stream, process, and act on data as it arrives.

In this blog, we’ll build a complete real-time data pipeline that ingests data with Kafka and processes it using Spark Streaming — all with practical examples and best practices.


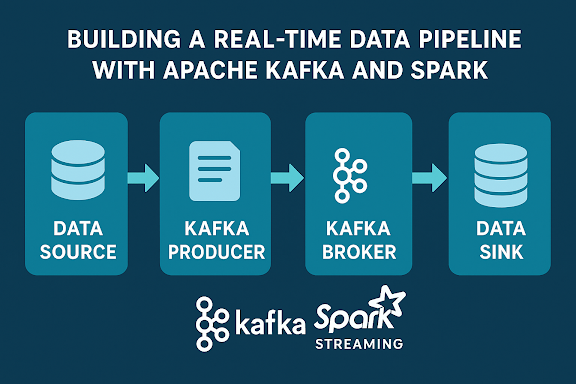
๐Ÿงฑ Architecture Overview

Let’s take a look at what we’re building:


This architecture allows:

  • Decoupling producers and consumers

  • Scalable processing via partitions

  • Real-time insights from Spark


⚙️ Step 1: Set Up Apache Kafka

➤ Install Kafka

sudo apt install default-jdk # Java is required wget https://downloads.apache.org/kafka/3.6.0/kafka_2.13-3.6.0.tgz tar -xzf kafka_2.13-3.6.0.tgz cd kafka_2.13-3.6.0

Start Kafka and Zookeeper

# Start Zookeeper bin/zookeeper-server-start.sh config/zookeeper.properties # Start Kafka Broker bin/kafka-server-start.sh config/server.properties

Create Kafka Topic

bin/kafka-topics.sh --create --topic user-events --bootstrap-server
localhost:9092 --partitions 3 --replication-factor 1

๐Ÿงช Step 2: Kafka Producer & Consumer (Python)

✅ Producer: Send Sample Events

from kafka import KafkaProducer import json, time producer = KafkaProducer( bootstrap_servers='localhost:9092', value_serializer=lambda v: json.dumps(v).encode('utf-8') ) while True: data = {'user_id': 1, 'action': 'click', 'timestamp': time.time()} producer.send('user-events', data) time.sleep(1)

✅ Consumer: Read Kafka Messages

from kafka import KafkaConsumer import json consumer = KafkaConsumer( 'user-events', bootstrap_servers='localhost:9092', value_deserializer=lambda x: json.loads(x.decode('utf-8')) ) for msg in consumer: print(msg.value)


⚡ Step 3: Real-Time Processing with Apache Spark

➤ Install PySpark

pip install pyspark

➤ Spark Streaming Code

from pyspark.sql import SparkSession from pyspark.sql.functions import from_json, col from pyspark.sql.types import StructType, StringType, TimestampType spark = SparkSession.builder.appName("KafkaSparkStreaming").getOrCreate() schema = StructType() \ .add("user_id", StringType()) \ .add("action", StringType()) \ .add("timestamp", TimestampType()) df = spark.readStream \ .format("kafka") \ .option("kafka.bootstrap.servers", "localhost:9092") \ .option("subscribe", "user-events") \ .load() json_df = df.selectExpr("CAST(value AS STRING)") \ .select(from_json(col("value"), schema).alias("data")) \ .select("data.*") agg_df = json_df.groupBy("action").count() query = agg_df.writeStream \ .outputMode("complete") \ .format("console") \ .start() query.awaitTermination()


๐Ÿ–ฅ️ Step 4: Choose a Data Sink

You can stream your data to:

  • Dashboards: Grafana (via InfluxDB)

  • Databases: PostgreSQL, MongoDB

  • Lakes: AWS S3, GCS

  • Elastic Stack: For log & event analytics

  • Another Kafka topic: For chaining processes

๐ŸŒŸ Best Practices for Production

PracticeDescription
Use partitions wiselyHelps scale horizontally
Enable SSL & SASLSecure Kafka clusters
Checkpointing in SparkFor fault tolerance
Schema RegistryPrevents data breaking downstream
MonitoringUse Prometheus + Grafana for Kafka health
Dockerize everythingFor reproducibility & deployment

๐Ÿง  What You’ve Learned

How to stream real-time data with Kafka Producers How to process and transform it in real-time with Apache Spark How to visualize or store the processed output How to apply best practices to keep your pipeline secure and reliable

๐Ÿ“Œ What’s Next?

๐Ÿ”— Coming soon on BitCodeMatrix:
  • Kafka Connect: Automate source/sink connectors

  • Flink vs Spark for Stream Processing

  • Deploying Kafka + Spark Pipelines on Kubernetes

  • Securing Kafka with ACLs and SSL


๐Ÿ” Final Thoughts

If you’re working on applications that depend on real-time actions, building this

kind of data pipeline is not just a technical challenge — it’s a business enabler.

With tools like Kafka and Spark, you’re empowered to build streaming solutions that

are scalable, fault-tolerant, and lightning-fast.Got questions or want help deploying

your real-time pipeline? Leave a comment or contact us!

Unleashing the Power of Docker and Docker Compose: Building Lightweight and Secure Containers

  Introduction In today's cloud-native world, containerization is the cornerstone of modern software development. Docker has revolutioni...